Mastering SSH Remote IoT Device On Raspberry Pi For Free
SSH remote access is an essential tool for managing IoT devices, especially when working with versatile platforms like the Raspberry Pi. Whether you're a hobbyist or a professional developer, understanding how to set up and use SSH for remote IoT device management can significantly enhance your productivity and efficiency. In this comprehensive guide, we'll walk you through everything you need to know about SSH remote IoT device management on Raspberry Pi, ensuring you can do so for free while maintaining top-notch security.
As the Internet of Things (IoT) continues to expand, remote device management has become a critical skill. With SSH, you can securely connect to your Raspberry Pi from anywhere in the world, enabling seamless updates, monitoring, and troubleshooting. This guide will delve deep into the process, providing step-by-step instructions and expert tips to help you master this powerful tool.
Whether you're new to SSH or looking to refine your skills, this article is designed to cater to all levels of expertise. By the end, you'll be equipped with the knowledge and confidence to manage your IoT devices remotely on Raspberry Pi, all without incurring any additional costs. Let's get started!
Read also:How To Join Telegram A Comprehensive Guide To Getting Started
Table of Contents
- Introduction to SSH
- Raspberry Pi Overview
- Why Use SSH for Remote IoT Devices
- Setting Up SSH on Raspberry Pi
- Connecting to a Remote IoT Device
- Securing Your SSH Connection
- Troubleshooting Common SSH Issues
- Best Practices for SSH Remote IoT Management
- Advanced SSH Techniques
- Conclusion and Next Steps
Introduction to SSH
Secure Shell (SSH) is a network protocol that provides encrypted communication between a client and a server. It is widely used for secure remote access to systems and devices, making it an ideal tool for managing IoT devices like Raspberry Pi.
SSH remote IoT device management offers numerous benefits, including secure data transfer, command execution, and file synchronization. By leveraging SSH, users can remotely control their Raspberry Pi devices, ensuring they remain operational and up-to-date without requiring physical access.
Key Features of SSH
- End-to-end encryption for secure communication.
- Support for file transfer via SCP and SFTP.
- Ability to execute commands on remote devices.
- Compatible with multiple operating systems and platforms.
Raspberry Pi Overview
The Raspberry Pi is a compact, affordable single-board computer that has revolutionized the world of IoT and embedded systems. Its versatility, combined with its low cost, makes it an ideal platform for both hobbyists and professionals.
With the ability to run a full Linux operating system, the Raspberry Pi offers a robust environment for developing and deploying IoT applications. Whether you're building a home automation system or a weather station, the Raspberry Pi provides the computational power and connectivity options needed to bring your ideas to life.
Key Specifications of Raspberry Pi
- Processor: Broadcom BCM2711, Quad-core Cortex-A72 (ARM v8) 64-bit SoC @ 1.5GHz.
- RAM: 2GB, 4GB, or 8GB LPDDR4-3200 SDRAM.
- Connectivity: Dual-band 2.4 GHz and 5.0 GHz IEEE 802.11ac wireless, Bluetooth 5.0, BLE.
- Ports: USB 3.0, USB 2.0, HDMI, Ethernet, GPIO.
Why Use SSH for Remote IoT Devices
SSH offers several advantages when it comes to managing IoT devices remotely. First and foremost, it provides a secure connection, ensuring that sensitive data is protected from unauthorized access. Additionally, SSH allows for seamless command execution and file transfer, making it an indispensable tool for remote device management.
For Raspberry Pi users, SSH enables you to:
Read also:Unveiling Dave Ramsey Net Worth A Comprehensive Guide To His Success Story
- Access your device from anywhere in the world.
- Perform system updates and installations remotely.
- Monitor device performance and logs in real-time.
- Transfer files securely using SCP or SFTP.
Setting Up SSH on Raspberry Pi
Enabling SSH on your Raspberry Pi is a straightforward process. Follow these steps to set up SSH on your device:
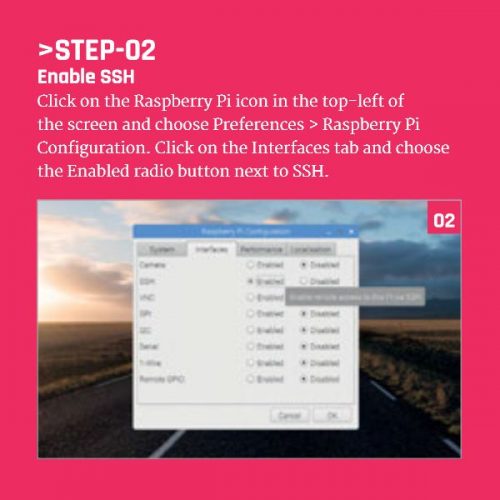
Step 1: Enable SSH on Raspberry Pi OS
To enable SSH on your Raspberry Pi, you can use the Raspberry Pi Configuration tool or the terminal. Here's how:
- Open the Raspberry Pi Configuration tool from the main menu.
- Select the "Interfaces" tab.
- Set SSH to "Enabled".
Alternatively, you can enable SSH via the terminal by running:
sudo systemctl enable ssh
sudo systemctl start ssh
Step 2: Find Your Raspberry Pi's IP Address
To connect to your Raspberry Pi via SSH, you'll need its IP address. You can find this by running:
hostname -I
Connecting to a Remote IoT Device
Once SSH is enabled on your Raspberry Pi, you can connect to it from another computer using an SSH client. Here's how:
Using SSH from a Linux or macOS Terminal
Open your terminal and enter the following command, replacing "pi" with your Raspberry Pi's username and "IP_ADDRESS" with its IP address:
ssh pi@IP_ADDRESS
When prompted, enter your Raspberry Pi's password to establish the connection.
Using SSH from Windows
Windows users can use the built-in SSH client or third-party tools like PuTTY. To connect using the built-in client, open PowerShell and enter the same command as above.
Securing Your SSH Connection
While SSH provides a secure connection by default, there are additional steps you can take to enhance its security:
- Change the default SSH port to a non-standard port.
- Disable password authentication and use SSH keys instead.
- Limit access to specific IP addresses using firewall rules.
- Regularly update your Raspberry Pi's operating system and SSH software.
Generating SSH Keys
To set up SSH key authentication, follow these steps:
- Generate a key pair on your local machine using
ssh-keygen. - Copy the public key to your Raspberry Pi using
ssh-copy-id pi@IP_ADDRESS. - Disable password authentication in the SSH configuration file (
/etc/ssh/sshd_config).
Troubleshooting Common SSH Issues
Even with proper setup, SSH connections can sometimes fail. Here are some common issues and their solutions:
- Connection Refused: Ensure SSH is enabled and the Raspberry Pi is connected to the network.
- Permission Denied: Check your username, password, and SSH key configuration.
- Timeout Errors: Verify the IP address and ensure there are no firewall restrictions.
Best Practices for SSH Remote IoT Management
To ensure smooth and secure remote management of your Raspberry Pi IoT devices, follow these best practices:
- Regularly back up your Raspberry Pi's data.
- Use strong, unique passwords for all accounts.
- Limit SSH access to trusted users and devices.
- Monitor SSH logs for suspicious activity.
Advanced SSH Techniques
For experienced users, SSH offers advanced features that can further enhance your remote management capabilities:
Tunneling with SSH
SSH tunneling allows you to securely forward network traffic between your local machine and a remote server. This is particularly useful for accessing services that are not directly exposed to the internet.
Automating SSH Connections
By configuring SSH keys and using tools like ssh-agent, you can automate SSH connections, making it easier to manage multiple devices.
Conclusion and Next Steps
In this comprehensive guide, we've explored the ins and outs of SSH remote IoT device management on Raspberry Pi. From setting up SSH to securing your connections and troubleshooting common issues, you now have the knowledge and tools to effectively manage your IoT devices remotely.
Remember, mastering SSH is an ongoing process. As technology evolves, so too will the tools and techniques available for remote device management. To stay ahead, consider exploring advanced SSH features and staying informed about the latest developments in IoT security.
Call to Action: We encourage you to try out the techniques discussed in this article and share your experiences in the comments below. For more in-depth guides and tutorials, explore our other articles on Raspberry Pi and IoT. Happy coding!
For further reading, consult the following trusted sources:
Article Recommendations